This is default featured slide 1 title

Go to Blogger edit html and find these sentences.Now replace these sentences with your own descriptions.This theme is Bloggerized by Lasantha Bandara - Premiumbloggertemplates.com.

This is default featured slide 2 title

Go to Blogger edit html and find these sentences.Now replace these sentences with your own descriptions.This theme is Bloggerized by Lasantha Bandara - Premiumbloggertemplates.com.

This is default featured slide 3 title

Go to Blogger edit html and find these sentences.Now replace these sentences with your own descriptions.This theme is Bloggerized by Lasantha Bandara - Premiumbloggertemplates.com.

This is default featured slide 4 title

Go to Blogger edit html and find these sentences.Now replace these sentences with your own descriptions.This theme is Bloggerized by Lasantha Bandara - Premiumbloggertemplates.com.

This is default featured slide 5 title

Go to Blogger edit html and find these sentences.Now replace these sentences with your own descriptions.This theme is Bloggerized by Lasantha Bandara - Premiumbloggertemplates.com.

Showing posts with label Samsung Galaxy Note 2 Jailbreak/Root. Show all posts

Sunday, December 23, 2012

Root Samsung Galaxy Note 2 with ChainFire the Easy Way

Chainfire’s CF-Root is currently the most used program when it comes to rooting Android based devices. The file works with Samsung Galaxy Note 2, Galaxy Tab, Galaxy S, Galaxy S2, Galaxy Nexus and Galaxy S3. There are several precise steps you need to accomplish in order to root Samsung Galaxy Note 2, so make sure you carefully read this entire article.

Safety measures are always important; for that matter, you must take into account the fact that the warranty of the device will become void once you install the root. Reinstalling Samsung’s official firmware is the only solution you have to unroot the smartphone and regain the warranty.

Galaxy Note 2 USB drivers are essentials for the operation you are about to perform, so make sure you download and install them on your computer. The next tools you need to download are Chainfire CF-Root and Odin3 v3.04. Unzip the folders to get access to the necessary files and begin by launching the Odin3 v3.04 file.

At this stage, your device needs to be turned off and rebooted in download mode. This step is performed by pressing and holding the volume down, home and power buttons until the screen is turned on. You will enter the download mode by holding down the volume up button.

The phone needs to be connected to the PC with the help of a USB cable in order to continue the root. Odin will automatically detect it, prompting an ADDED message on the screen. Click the PDA button to select the CF-Auto-Root-SGN2.tar and uncheck the re-partition option in case it has been ticked.

Run Odin to begin the installation. The message PASS should be displayed on the screen if the installation is successful; otherwise, the smartphone will display a FAIL message meaning that you have to close Odin and unplug the device from the computer.

At the end of the installation, you may disconnect your Samsung Galaxy Note 2 from the computer. The rooted device may now be accessorized with as many root-based apps as you like.

Easy Steps to Root or Jailbreak Your Samsung Galaxy Note 2

You’re probably asking yourselves “why root a smartphone that already grants me permission to an infinite number of free apps and games?” Well, much like Apple’s iPhone, there are many other advantages and benefits one can get by doing a Samsung Galaxy Note 2 Root or Jailbreak. And then, there’s always the great feeling of being the true “master” of your own device.
Jailbreaks and roots are not normally accepted by manufacturing companies; therefore, you must bear in mind that there are great risks involved, as well. You are the only one who is responsible in case your smartphone gets broken during the rooting process. Yet, there would be no gain without pain, so you might as well give it a try.
The GT-N7100 version of the Samsung Galaxy Note 2 is the only one that can be rooted. Just to be on the safe side, press the Settings option on your Galaxy Note 2, go to the section “About Device” and read the information provided at the section “Model Number”. If the two versions match, it means you are the lucky possessor of a “rootable” device. For additional security measures, back up all the information you may have on your smartphone so it wouldn’t get lost during the rooting process.
There are several files you will use in order to root your device, namely, Samsung USB drivers, Odin – the software that will root your smartphone – and finally the rooting code for GT-N7100. These may be found and downloaded on specific websites on the Internet.
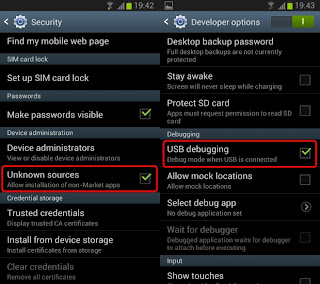
Now that your phone is secured and the battery life is running at 70% or more, you may start to make a few Setting changes so you can fully Root Samsung Galaxy Note 2. Enter Settings > go to the Security section > and look for Device Administration. The “Unknown Sources” in the menu of this section should be checked. The other switch is performed from Settings > Developer Options and “USB debugging” under “Debugging”.
You may now begin to run Odin. You must remember to tick the 'Auto Reboot' and 'Reset Time' once the installation program begins. After unzipping the CF-Auto-Root-t03g-gtn7100.zip you must select the file ending in .tar.md5 and add it in the space near the PDA button.
The next step you need to accomplish is to turn your smartphone off and reboot it by pressing the volume down, home and power buttons at the same time. Press the volume up button and continue until a ‘Downloading…’ screen appears on your display. Connect the phone to the PC using the USB and press the Start button in Odin to begin the root. The phone will automatically reboot at the end of the process and if everything goes well, you should be able to download both free and non-free apps at the end of the root.